Deploy to Amazon Elastic Container Service
DETAILS: Tier: Free, Premium, Ultimate Offering: GitLab.com, Self-managed, GitLab Dedicated
This step-by-step guide helps you deploy a project hosted on GitLab.com to the Amazon Elastic Container Service (ECS).
In this guide, you begin by creating an ECS cluster manually using the AWS console. You create and deploy a simple application that you create from a GitLab template.
These instructions work for both SaaS and self-managed GitLab instances. Ensure your own runners are configured.
Prerequisites
- An AWS account. Sign in with an existing AWS account or create a new one.
- In this guide, you create an infrastructure in
us-east-2region. You can use any region, but do not change it after you begin.
Create an infrastructure and initial deployment on AWS
For deploying an application from GitLab, you must first create an infrastructure and initial deployment on AWS. This includes an ECS cluster and related components, such as ECS task definitions, ECS services, and containerized application image.
For the first step here, you create a demo application from a project template.
Create a new project from a template
Use a GitLab project template to get started. As the name suggests, these projects provide a bare-bones application built on some well-known frameworks.
- In GitLab on the left sidebar, at the top, select Create new ({plus}) and New project/repository.
- Select Create from template, where you can choose from a Ruby on Rails, Spring, or NodeJS Express project. For this guide, use the Ruby on Rails template.
- Give your project a name. In this example, it's named
ecs-demo. Make it public so that you can take advantage of the features available in the GitLab Ultimate plan. - Select Create project.
Now that you created a demo project, you must containerize the application and push it to the container registry.
Push a containerized application image to GitLab container registry
ECS is a container orchestration service, meaning that you must provide a containerized application image during the infrastructure build. To do so, you can use GitLab Auto Build and Container Registry.
-
On the left sidebar, select Search or go to and find your
ecs-demoproject. -
Select Set up CI/CD. It brings you to a
.gitlab-ci.ymlcreation form. -
Copy and paste the following content into the empty
.gitlab-ci.yml. This defines a pipeline for continuous deployment to ECS.include: - template: AWS/Deploy-ECS.gitlab-ci.yml -
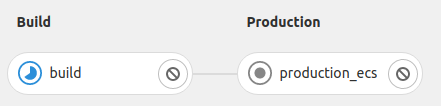
Select Commit Changes. It automatically triggers a new pipeline. In this pipeline, the
buildjob containerizes the application and pushes the image to GitLab container registry.
-
Visit Deploy > Container Registry. Make sure the application image has been pushed.

Now you have a containerized application image that can be pulled from AWS. Next, you define the spec of how this application image is used in AWS.
Note that the production_ecs job fails because ECS Cluster is not connected yet. You'll fix this
later.
Create an ECS task definition
ECS Task definitions is a specification about how the application image is started by an ECS service.
-
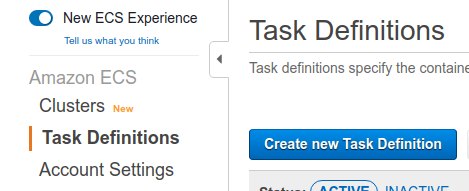
Go to ECS > Task Definitions on AWS console.
-
Select Create new Task Definition.
-
Choose EC2 as the launch type. Select Next Step.
-
Set
ecs_demoto Task Definition Name. -
Set
512to Task Size > Task memory and Task CPU. -
Select Container Definitions > Add container. This opens a container registration form.
-
Set
webto Container name. -
Set
registry.gitlab.com/<your-namespace>/ecs-demo/master:latestto Image. Alternatively, you can copy and paste the image path from the GitLab container registry page. -
Add a port mapping. Set
80to Host Port and5000to Container port. -
Select Create.


Now you have the initial task definition. Next, you create an actual infrastructure to run the application image.
Create an ECS cluster
An ECS cluster is a virtual group of ECS services. It's also associated with EC2 or Fargate as the computation resource.
-
Go to ECS > Clusters on AWS console.
-
Select Create Cluster.
-
Select EC2 Linux + Networking as the cluster template. Select Next Step.
-
Set
ecs-demoto Cluster Name. -
Choose the default VPC in Networking. If there are no existing VPCs, you can leave it as-is to create a new one.
-
Set all available subnets of the VPC to Subnets.
-
Select Create.
-
Make sure that the ECS cluster has been successfully created.

Now you can register an ECS service to the ECS cluster in the next step.
Note the following:
- Optionally, you can set a SSH key pair in the creation form. This allows you to SSH to the EC2 instance for debugging.
- If you don't choose an existing VPC, it creates a new VPC by default. This could cause an error if it reaches the maximum allowed number of internet gateways on your account.
- The cluster requires an EC2 instance, meaning it costs you according to the instance-type.
Create an ECS Service
ECS service is a daemon to create an application container based on the ECS task definition.
-
Go to ECS > Clusters > ecs-demo > Services on the AWS console
-
Select Deploy. This opens a service creation form.
-
Select
EC2in Launch Type. -
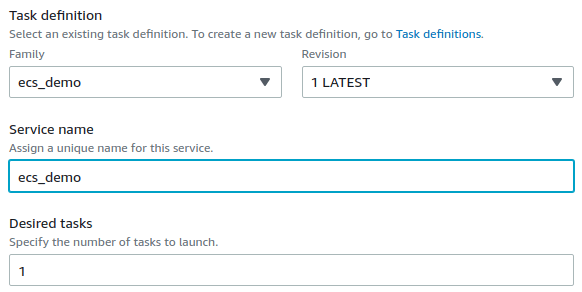
Set
ecs_demoto Task definition. This corresponds to the task definition you created above. -
Set
ecs_demoto Service name. -
Set
1to Desired tasks. -
Select Deploy.
-
Make sure that the created service is active.

Note that AWS's console UI changes from time to time. If you can't find a relevant component in the instructions, select the closest one.
View the demo application
Now, the demo application is accessible from the internet.
-
Go to EC2 > Instances on the AWS console
-
Search by
ECS Instanceto find the corresponding EC2 instance that the ECS cluster created. -
Select the ID of the EC2 instance. This brings you to the instance detail page.
-
Copy Public IPv4 address and paste it in the browser. Now you can see the demo application running.
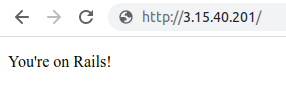
In this guide, HTTPS/SSL is not configured. You can access to the application through HTTP only
(for example, http://<ec2-ipv4-address>).
Set up Continuous Deployment from GitLab
Now that you have an application running on ECS, you can set up continuous deployment from GitLab.
Create a new IAM user as a deployer
For GitLab to access the ECS cluster, service, and task definition that you created above, You must create a deployer user on AWS:
-
Go to IAM > Users on AWS console.
-
Select Add user.
-
Set
ecs_demoto User name. -
Enable Programmatic access checkbox. Select Next: Permissions.
-
Select
Attach existing policies directlyin Set permissions. -
Select
AmazonECS_FullAccessfrom the policy list. Select Next: Tags and Next: Review. -
Select Create user.
-
Take note of the Access key ID and Secret access key of the created user.

NOTE: Do not share the secret access key in a public place. You must save it in a secure place.
Setup credentials in GitLab to let pipeline jobs access to ECS
You can register the access information in GitLab CI/CD Variables. These variables are injected into the pipeline jobs and can access the ECS API.
-
On the left sidebar, select Search or go to and find your
ecs-demoproject. -
Go to Settings > CI/CD > Variables.
-
Select Add Variable and set the following key-value pairs.
Key Value Note AWS_ACCESS_KEY_ID<Access key ID of the deployer>For authenticating awsCLI.AWS_SECRET_ACCESS_KEY<Secret access key of the deployer>For authenticating awsCLI.AWS_DEFAULT_REGIONus-east-2For authenticating awsCLI.CI_AWS_ECS_CLUSTERecs-demoThe ECS cluster is accessed by production_ecsjob.CI_AWS_ECS_SERVICEecs_demoThe ECS service of the cluster is updated by production_ecsjob. Ensure that this variable is scoped to the appropriate environment (production,staging,review/*).CI_AWS_ECS_TASK_DEFINITIONecs_demoThe ECS task definition is updated by production_ecsjob.
Make a change to the demo application
Change a file in the project and see if it's reflected in the demo application on ECS:
-
On the left sidebar, select Search or go to and find your
ecs-demoproject. -
Open the
app/views/welcome/index.html.erbfile. -
Select Edit.
-
Change the text to
You're on ECS!. -
Select Commit Changes. This automatically triggers a new pipeline. Wait until it finishes.
-
Access the running application on the ECS cluster. You should see this:
Congratulations! You successfully set up continuous deployment to ECS.
NOTE:
ECS deploy jobs wait for the rollout to complete before exiting. To disable this behavior,
set CI_AWS_ECS_WAIT_FOR_ROLLOUT_COMPLETE_DISABLED to a non-empty value.
Set up Review Apps
To use Review Apps with ECS:
- Set up a new service.
- Use the
CI_AWS_ECS_SERVICEvariable to set the name. - Set the environment scope to
review/*.
Only one Review App at a time can be deployed because this service is shared by all review apps.
Set up Security Testing
Configure SAST
To use SAST with ECS, add the following to your .gitlab-ci.yml file:
include:
   - template: Jobs/SAST.gitlab-ci.yml
For more details and configuration options, see the SAST documentation.
Configure DAST
To use DAST on non-default branches, set up review apps
and add the following to your .gitlab-ci.yml file:
include:
  - template: Security/DAST.gitlab-ci.yml
To use DAST on the default branch:
- Set up a new service. This service will be used to deploy a temporary DAST environment.
- Use the
CI_AWS_ECS_SERVICEvariable to set the name. - Set the scope to the
dast-defaultenvironment. - Add the following to your
.gitlab-ci.ymlfile:
include:
  - template: Security/DAST.gitlab-ci.yml
  - template: Jobs/DAST-Default-Branch-Deploy.gitlab-ci.yml
For more details and configuration options, see the DAST documentation.
Further reading
- If you're interested in more of the continuous deployments to clouds, see cloud deployments.
- If you want to quickly set up DevSecOps in your project, see Auto DevOps.
- If you want to quickly set up the production-grade environment, see the 5 Minute Production App.